Using AWS Rekognition in CFML: Matching Faces from Two Images
Posted 13 August 2018
Rekognition has the ability to compare two images of a person and determine if they are the same person based on the features of the faces in each image. Rekognition can do this even when the images are of the same person over years, or decades. Like other machine learning systems, this feature is subject to bias and error, but in my work with the feature, it works quite well.
The core use case for this feature is security. This feature of Rekognition is used to perform real-time facial analysis of someone standing at a door, looking into a camera, and matching that face with an image on record. My team is using this feature to match a student’s picture in their official University ID with their face being captured in real-time on a webcam to authorize a student to take an online exam.
In a widely covered story, the ACLU did a test of Rekognition matching mugshots to members of Congress. That test resulted in false matches of 28 members of congress, primary people of color, to mugshots of criminals. Amazon’s response to this test is worth reading.
Following the usual “make a request object, get a result object back” pattern in the AWS Java SDK, here’s an outline of how you perform face matching in Rekognition:
- Get a copy of the Rekognition client we created in the first part of this series.
- Create a “CompareFacesRequest” object.
- Create two “Image” objects in the Rekognition service to work with. One will be the source image; the other the target image for comparison.
- Create two “S3Object” objects that specify the paths to the images on S3 that you want to treat as the images for the Image objects created in step 3.
- Set the S3Objects into the Image objects.
- Set the Image objects into the CompareFacesRequest.
- Run the CompareFacesRequest.
- Get back a CompareFacesResult object.
The Code to Face Match Between Two Images
Here’s how we do this in the AWSPlaybox app:
If you haven’t already read the entry on the basic setup needed to access AWS from CFML, please do so now.
As in the example of performing sentiment analysis on the people in an image, we’re going to start the process in /rekognition.cfm by providing a list of paths to images already in S3 from wihch we can randomly choose:
<cfset s3images.facesForMatching = [ "images/bk-imageOne.png", "images/bk-imageTwo.jpg", "images/jk-imageOne.jpg", "images/jk-imageTwo.jpg", "images/bk-imageThree.jpg", "images/bk-imageFour.jpg" "images/jk-imageThree.jpg","images/ak-imageOne.jpg","images/ak-imageTwo.jpg"] />As before, this is just an array of paths to files on S3, nothing more. The files need to already be on S3. The code in the AWSPlaybox app does not load them up there for you.
Later in /rekognition.cfm, we randomly select two of the images from the array set them as the source image and target image (the image we are going to compare against). We pass in the name of the S3 bucket where the images can be found, and the string value of the paths to the source and target images.
case 'compareFaces':
	sourceImage = s3images.facesForMatching[randRange(1, arrayLen(s3images.facesForMatching))];
	targetImage = s3images.facesForMatching[randRange(1, arrayLen(s3images.facesForMatching))];
	compareFacesResult = rekognitionLib.compareFaces(s3images.awsBucketName, sourceImage, targetImage);
Now we hop over to rekognitionLib.cfc, where the real work happens. If you read through compareFaces(), you’ll see the eight steps listed above translated into code:
// 1. Get a copy of the Rekognition client
variables.rekognitionService = application.awsServiceFactory.createServiceObject('rekognition');
// 2. Create a "compareFacesRequest" object.
var compareFacesRequest = CreateObject('java', 'com.amazonaws.services.rekognition.model.CompareFacesRequest').init();
// 3. Create two "Image" objects in the Rekognition service to work with. One will be the source image; the other the target image for comparison.
var faceImage1 = CreateObject('java', 'com.amazonaws.services.rekognition.model.Image').init();
var faceImage2 = CreateObject('java', 'com.amazonaws.services.rekognition.model.Image').init();
// 4. Create two "S3Object" objects that specify the paths to the images on S3 that you want to use as the images for the Image objects created in step 3.
var faceImage1S3Object = CreateObject('java', 'com.amazonaws.services.rekognition.model.S3Object').init();
faceImage1S3Object.setBucket(arguments.awsBucketName);
faceImage1S3Object.setName(arguments.face1Path);
var faceImage2S3Object = CreateObject('java', 'com.amazonaws.services.rekognition.model.S3Object').init();
faceImage2S3Object.setBucket(arguments.awsBucketName);
faceImage2S3Object.setName(arguments.face2Path);
// 5. Set the S3Objects into the Image objects.
faceImage1.setS3Object(faceImage1S3Object);
faceImage2.setS3Object(faceImage2S3Object);
// 6. Set the Image objects into the CompareFacesRequest.
compareFacesRequest.setSourceImage(faceImage1);
compareFacesRequest.setTargetImage(faceImage2);
// 7. Run the CompareFacesRequest, and 8. Get back a CompareFacesResult object.
return variables.rekognitionService.compareFaces(compareFacesRequest);
This function returns a CompareFacesResult object to /rekognition.cfm because I wanted to split out the getSimilarityValue() code into its own function. You could just as easily do that work in compareFaces().
Processing the Results of the Face Match Analysis
The compareFaces function in Rekognition returns an array of objects (because this is Java) of the type com.amazonaws.services.rekognition.model.CompareFacesMatch. There will be one CompareFacesMatch object for each face found in the image.
The CompareFacesMatch object contains only two useful properties: the bounding box (in pixels) of the detected face, and the similarity value of the face in the source image as compared to the face in the target image. The similarity value is like the confidence value that we’ve seen in other Rekognition functionality. It runs on a scale from 0-100, with 100 meaning that the service is 100% confident that the faces in the source and target images are the same person.
In order to process the CompareFacesMatch array, we loop over each CompareFacesMatch object. In this example, we’re assuming that there is a single face in each image. Here’s the code for rekognitionLib.getSimilarityValue():
public numeric function getSimilarityValue(required any compareFacesResult) {
	var similarityValue = -1;
	var faceMatchesArray = arguments.compareFacesResult.getFaceMatches();
	if (arrayLen(faceMatchesArray) gt 0) {
		similarityValue = faceMatchesArray[1].getSimilarity();
	}
	return similarityValue;
}
If there are no face matches between the two images, we return a -1 value. If there are matches returned, we assume that there’s only one face in the picture (because that’s the use case we work under), and call the getSimilarity() method of the first CompareFacesMatch object in the array.
Displaying the Results
Back on /rekognition.cfm, we can take the similarity value returned from rekognitionLib.getSimilarityValue() and create a message for display later:
similarityValue = rekognitionLib.getSimilarityValue(compareFacesResult);
if (similarityValue gte 0) {
	rekogFunctionResult = "Rekognition gave a similarity value of " & similarityValue & " to the two images.";
} else {
	rekogFunctionResult = "There was no match between the two images!";
}
And in the output section, we display the source and target images alongside the result message:
<cfcase value="compareFaces">
	<cfoutput>
		<p>#rekogFunctionResult#</p>
		<p>Here are the two images used:</p>
		<p>
			<img src="http://#s3images.awsBucketName#.s3.amazonaws.com/#sourceImage#" width="300" height="300" border="1" />
			<img src="http://#s3images.awsBucketName#.s3.amazonaws.com/#targetImage#" width="300" height="300" border="1" />
		</p>
	</cfoutput>
</cfcase>
Here’s an example result:
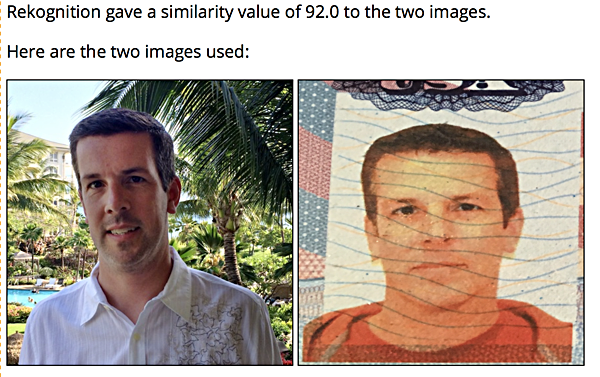
That’s a nice picture of me on vacation and a terrible picture of my picture in my passport taken on my phone a couple of years later. Despite having the wavy blue lines in the target photo, and the target photo being taken at an odd angle, Rekognition was able to match the faces.
Caveat Emptor
Face matching in Rekognition is far from perfect. I’ve used this feature for a while now, and here are some things that I’ve learned:
- Face matching doesn’t work when the individuals are wearing sunglasses or hats.
- The more the person in the image is directly facing the camera, the more accurate the match results will be.
- Rekognition really can’t match an image of someone as a child with that person as an adult. Facial features are simply too different with that kind of age range. Rekognition can match faces with an image of the person in their mid-to-late teen years and an image of that same person in their 60’s.
- If the target image (the image you are matching to) is of low quality, a match is only made if the source image was created/taken within a couple of years of the target image.
So that’s it for face matching in Rekognition. Next, we’ll see how to extract text from an image.